'Will You...' Cards
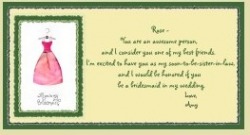
These are the ‘will you’ cards that I made on Photo Shop - they are more than a little on the corny side, but the girls loved it. It was well known before we even announced our engagement that our siblings would be in our bridal party, and we had already talked about dresses when I realized that I never formally asked them. Creating these took only a few minutes, and I put a personalized note for each girl on them. (His older sister called me up laughing when she receive hers)
Save-The-Dates
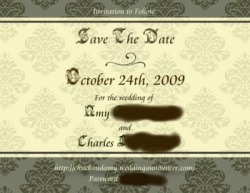
This is the Save-The-Date I created using PhotoShop, and then uploaded and ordered from Vistaprint as a postcard with matching envelopes (I had a free postcard deal, so all I paid for was the photo upload and envelopes). We bought a roll of magnet tape from Micheals and just glued a strip on the back.
I would highly recomend using VistaPrint - they were inexpensive, looked great and came within a couple days, even with the cheapest shipping option.
I would highly recomend using VistaPrint - they were inexpensive, looked great and came within a couple days, even with the cheapest shipping option.
Wedding Invitations

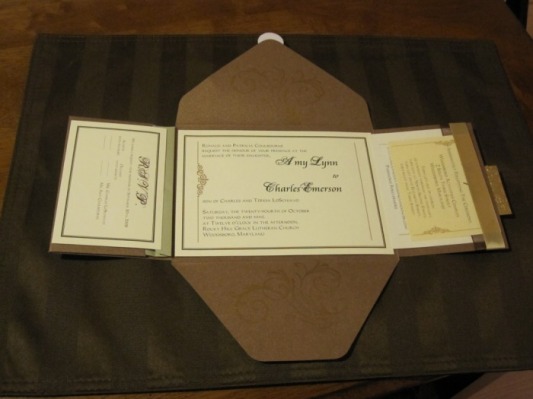
I bought our DIY invitations from Target…for a box of 50 brown metallic pocketfolds, invites, and RSVP card/envelopes, it cost 30 dollars. I went to Micheals and bought Copper Metallic Cardstock & shiny gold damask Cardstock for our monogram on the front of the invite for just a mere 3 dollars.
I also bought floral ivory seals to use on the back of the invites (a couple dollars), as well as a large stamp in a swirl design to use on two of the flaps of the pocketfold in a copper ink. I bought a box of ivory cards to use for the reception/accommodation cards, but ended up using cream construction paper at the last minute for the reception cards. Since the pocketfold only had one pocket (for the RSVP card), I went ahead and bought two types of ribbon (a wide chiffon brown and a narrower cream satin) and wrapped it around the opposite flap, to create a second pocket for the other two cards. I closed off the seams with some hot glue and a small version of our monogram on the copper/gold squares. I addressed the fronts with a black calligraphy pen that I already owned instead of the labels that came with the invitation box - I think they made it look cheap.
I also bought floral ivory seals to use on the back of the invites (a couple dollars), as well as a large stamp in a swirl design to use on two of the flaps of the pocketfold in a copper ink. I bought a box of ivory cards to use for the reception/accommodation cards, but ended up using cream construction paper at the last minute for the reception cards. Since the pocketfold only had one pocket (for the RSVP card), I went ahead and bought two types of ribbon (a wide chiffon brown and a narrower cream satin) and wrapped it around the opposite flap, to create a second pocket for the other two cards. I closed off the seams with some hot glue and a small version of our monogram on the copper/gold squares. I addressed the fronts with a black calligraphy pen that I already owned instead of the labels that came with the invitation box - I think they made it look cheap.
The Finished Invitation
Invite Layouts
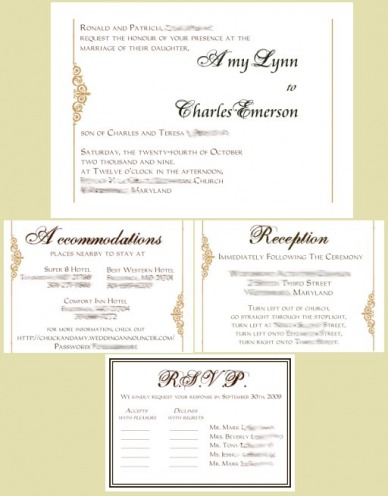
This is how we made up the cards in Photoshop. Our fonts were Carleton and OneFellSwoop, both of which were downloaded from Dafont.com. We are printing out the invite and RSVP card on the paper that came with the kit (ivory with a brown border), and the Reception and Accommodation Cards on the Ivory and Cream Cardstock. Since we are having a smaller wedding, I went and personalized each RSVP card with the guests names…I’m hoping it will cut down on the people who will assume they can bring guests, as well as making people feel like they are special (bah, corny, I know).
Wedding Programs
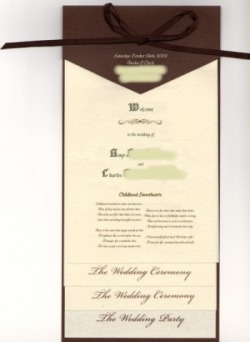
Here are our wedding programs, from the Brides Collection. We got them on sale at Michaels for 23 dollars for a box of 40 (we bought two boxes) and are going to print them out ourselves. We are probably going to change the ribbon to either ivory or sage green as well….
Photo Upload Cards
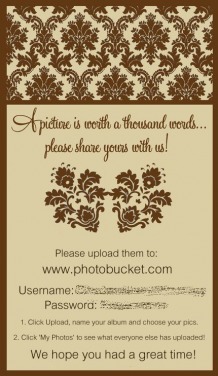
These are the photo upload cards that I made for our guests that we are giving along with each of our favor bags. We’ve already gave a few out at our engagement party and guests uploaded their photo’s from that afternoon, so we are hoping that our guests will use them at the wedding too!
Table Numbers
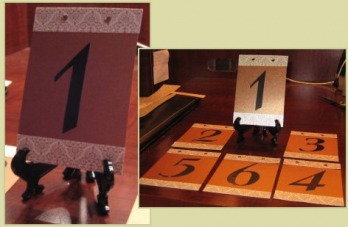
These are my DIY table numbers. I used metallic copper cardstock (he leftovers from our invitation attempts, already pre-cut to the size of our reception cards, lol), along with a metallic ivory/tan damask print cardstock cut into strips, and made cards to put into Victorian-style mini easels. I then cut out numbers from a pack of table number tents that I found at AC Moore (tedious work, mind you) and glued them onto each card, finishing the whole thing off with a few topaz rhinestones along the top. Since we have so much going on with our centerpieces, we wanted to do something simpler as not to overwhelm the tables.
Photo Frames

So, I bought a whole bunch of these vintage baroque style frames in the dollar bin at Michaels one day while I was on break from work - some are square, some are oval, and I am spray painting them all black (compared to the original bright orange and red they were when I bought them).
We are going to put our parents, grandparents, etc, wedding photo's in them, and put them out on display for everyone.
We are going to put our parents, grandparents, etc, wedding photo's in them, and put them out on display for everyone.
Cardbox

Ok, so this isn't really DIY - but I didn't know where else to put it. Chuck found this awesome 40's style radio box from a local discount store, and bought it for a whopping 10 dollars. It looks like a replica of those italian jewlery boxes with the gorgeous wood finishes...except the inside resembles the workings of an old time clock. I'm not sure if I am going to cut a slot into the top of it, or just leave the lid propped open - because I would like to have it around have the wedding. I already see a spot in the living room for it.
Cameo Votives
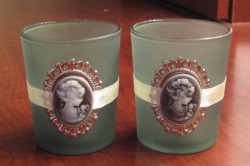
I have a thing for cameo's. I don't know why or when it started, but I've accumulated several years worth of cameo jewelry, hair accessories, even artwork. Which is why I love these votives that I found at the dollar store. I bought a whole bunch of them and plan on having them displayed around the cake in a semi circle.
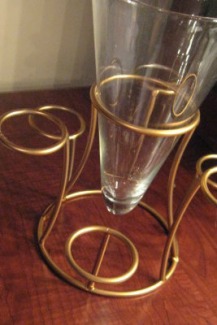
Sweetheart Table Centerpiece
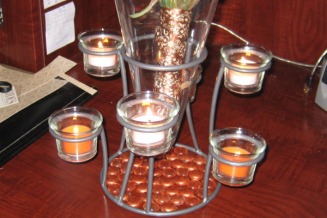
Our vase/votive holder thingy-m-bober was a weird flat pewter color when I bought it from JoAnn Designs...it looked so ugly, in fact, that I couldn't fathom why anyone would have it as part of their normal decor.
A can of metallic gold spray paint changed that - it was 2.00 for a mini can at Micheal's, and it did wonders. I wanted to do bronze, but alas, no one carried metallic bronze spray paint - or were sold out of it.
I personally think it looks 10 times better now.
A can of metallic gold spray paint changed that - it was 2.00 for a mini can at Micheal's, and it did wonders. I wanted to do bronze, but alas, no one carried metallic bronze spray paint - or were sold out of it.
I personally think it looks 10 times better now.
Bridesmaid Bouquets
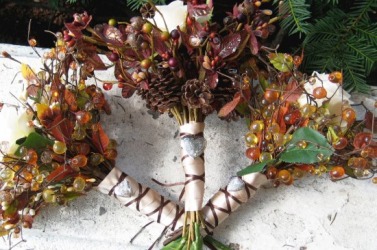
More infomation on our bouquets can be found under flowers, but I wanted to go ahead and post some pictures of them here, since they are technically DIY.
I bought the crystal stems (24 of them), two different types of ribbon and an ivory rose for the center of each bouquet for under 20 dollars at Micheal's. Assembling them was a little difficult, but because each stem is wire, they hold their position...you've just got to work at it until it resembles a bouquet instead of a bunch of twigs, which is the hard part.
I bought the crystal stems (24 of them), two different types of ribbon and an ivory rose for the center of each bouquet for under 20 dollars at Micheal's. Assembling them was a little difficult, but because each stem is wire, they hold their position...you've just got to work at it until it resembles a bouquet instead of a bunch of twigs, which is the hard part.
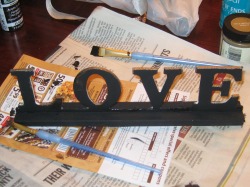
Not sure what to call these...
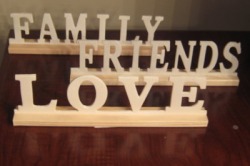
I also found these wood cut-outs at the dollar store, and I am going to paint or decoupage them (haven't decided yet) and put them on our guest book/photo table along with all of the wedding photo's of our families and friends. I like how it's not the typical 'i do' letters, or the 'live laugh love' ones.
Escort Cards
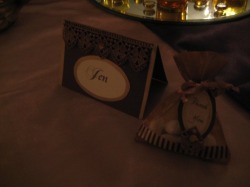
This is a project that my mom started, and while I think it wasn't necessary, I do love them. She took brown cardstock and made tents, and then with a gold paint pen outlined the sides. She took gold trim (some of a lighter color, some have a darker color) and glued it to the top, and then took one of two color rhinestones (olive green and topaz) and glued it to the center. I printed out the names onto cream colored cardstock using Champagion and canteno fonts, and she took a gold paint pen to those as well. This picture doesn't do it justice...it actually looks a lot more vibrant in person.
Menu
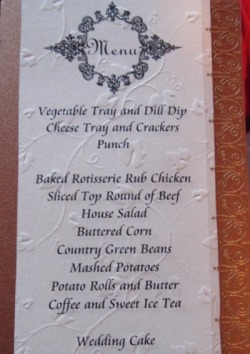
I made a little card for each table on the same copper metallic cardstock the the table numbers are out of. They will be on the other side of the centerpiece in the same stand that the numbers are in.
Wedding Quilt (aka, our guestbook)
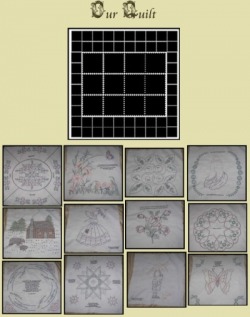
On top of the quilt, we are asking each guest to sign their names on a photo mat when they walk into the church - it's actually two different mats that I bought on clearance at Micheal's, so that the photo opening is for an 8x10 photo.
Engagement Photo Mat
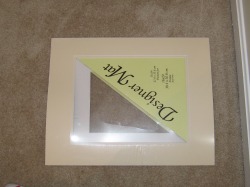
On top of the quilt, we are asking each guest to sign their names on a photo mat when they walk into the church - it's actually two different mats that I bought on clearance at Micheal's, so that the photo opening is for an 8x10 photo.
Photo Collage and Seating Chart
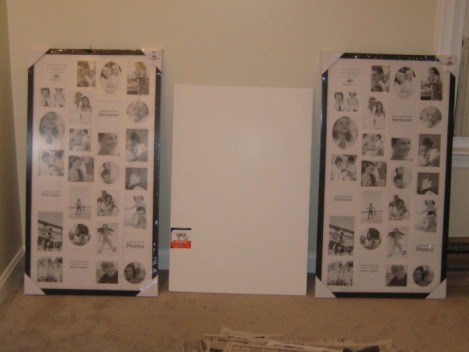
So...I found these photo collage frames at Ross for six dollars each, and we are going to put various photos of ourselves throughout the years - newborn to present day. In the center will be our seating chart...which at the moment, looks rather plain. I promise I'll make it look, well...like a seating chart ;-)
This is how it will be displayed at the reception hall, with our Engagement Photo Mat sitting on the table in front if it all.
This is how it will be displayed at the reception hall, with our Engagement Photo Mat sitting on the table in front if it all.
Seating Chart
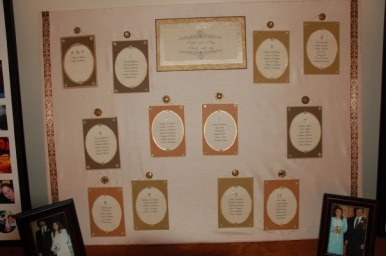
Basically, a gigantic scrapbook on silk covered posterboard. We took heavy cardstock mats in different colors and 'hung' them from antique buttons and gold thread. On each mat was an oval with the table number and people, and had little gold rhinestones. On either side there was brown/cream damask ribbon, and the title was made out of 3 different mettalic cardstocks.
The computer was our friend for this project.
The computer was our friend for this project.
